TABLE OF CONTENTS
How to Make a Smithing Table in Minecraft: Easy Guide
If you're trying to upgrade gear to Netherite or use a smithing template, you're blocked until you have a smithing table — and that's exactly why you're here. Most guides tell you the recipe and stop there, but this one covers everything from crafting to advanced usage so you never hit a dead end mid-progression.
What Is a Smithing Table (and Why You Actually Need One)
Understanding the tool before you build it saves you from wasted resources later.
The smithing table is one of those blocks that looks optional until it suddenly isn't. In Java and Bedrock Edition 1.20+, it's the only way to upgrade diamond gear to Netherite and the only way to apply armor trims — cosmetic patterns that personalize your equipment without affecting stats.
Before 1.20, the smithing table had a simpler two-slot interface. Post-1.20, it gained a third slot specifically for smithing templates, which changed how the entire upgrade system works. If you're playing on an older version or a modded server, your interface may look different.
| Feature | Pre-1.20 Smithing Table | Post-1.20 Smithing Table |
|---|---|---|
| Slots | 2 (gear + material) | 3 (template + gear + material) |
| Netherite Upgrade | Yes, direct | Requires Netherite Upgrade Template |
| Armor Trims | No | Yes |
| Villager Job | Toolsmith | Toolsmith |
| Recipe Changed? | No | No |
Materials You Need to Make a Smithing Table
Two iron ingots and four planks — simple recipe, but the details matter.
The recipe is deliberately cheap because Mojang wants players to access this block early. Here's exactly what you need:
- 2 Iron Ingots — smelted from raw iron in a furnace or blast furnace
- 4 Wood Planks — any type works (oak, spruce, birch, jungle, acacia, dark oak, mangrove, cherry, bamboo, crimson, warped)
That's it. No rare materials, no special conditions. You can craft this before you ever visit the Nether, which is intentional — you want it ready before you get Netherite.
Getting Iron Fast:
- Dig down to Y-level 16 or lower for best iron ore density
- Look for exposed iron in caves — faster than strip mining early game
- Smelt raw iron in a furnace (1 raw iron = 1 iron ingot)
- A single iron vein typically yields 4–10 raw iron, more than enough
- Open your crafting table (right-click/interact)
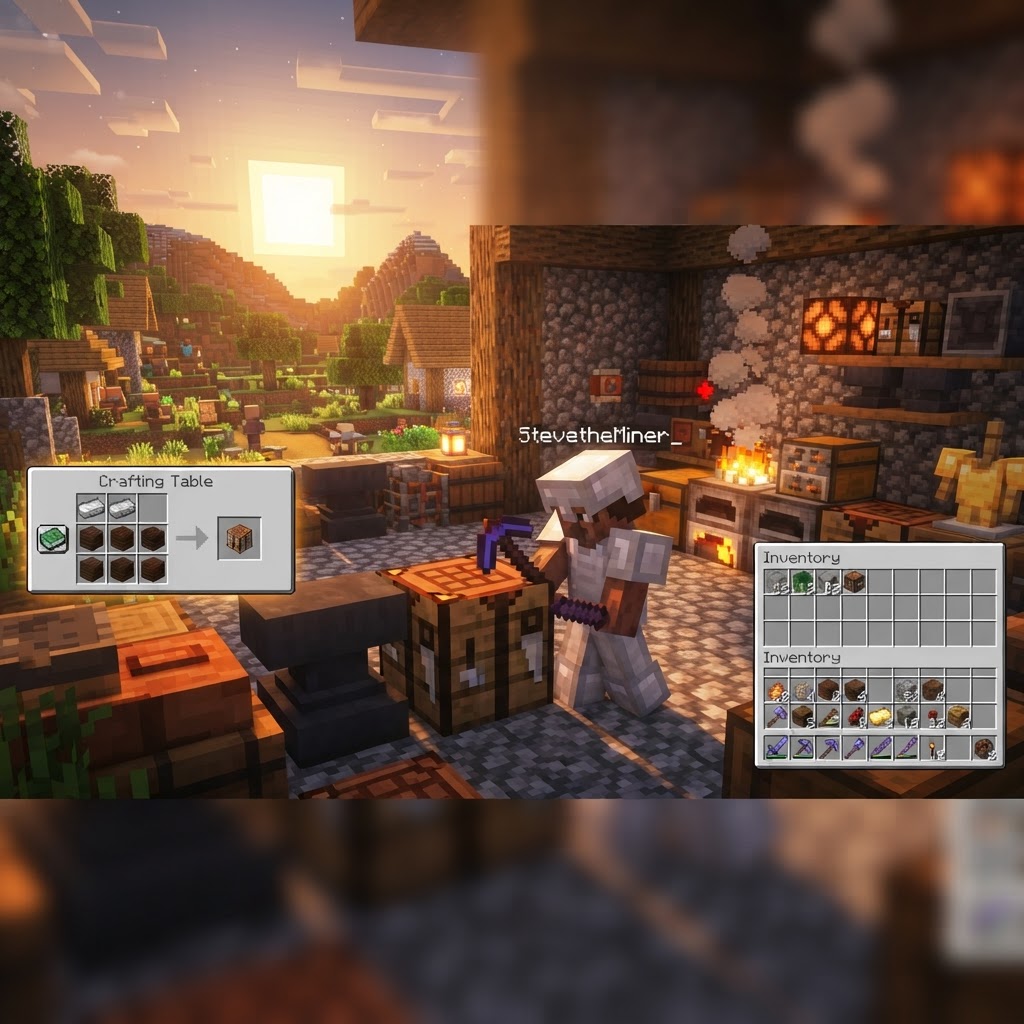
- Place 1 iron ingot in slot 1 (top-left)
- Place 1 iron ingot in slot 2 (top-middle)
- Fill the remaining 6 left/middle slots (rows 2 and 3) with wood planks
- The smithing table appears in the output slot
- Drag it to your inventory
- Not every village generates a toolsmith house
- If a toolsmith house exists but has no villager, the smithing table is still there
- You can pick it up with any axe (fastest) or by hand
- Breaking it doesn't anger villagers unless they're actively using it
- Obtain a Netherite Upgrade Template (Bastion Remnant)
- Have your diamond gear in hand
- Have at least 1 Netherite ingot
- Place all three in the correct slots
- Take the Netherite item from the output
- Same three-slot structure, but Slot 3 accepts 16+ different materials
- Different materials change the trim color
- Trims are purely cosmetic — no stat changes
- You can apply trims to Netherite gear without affecting its stats
- Chestplate (most armor points)
- Pickaxe (most used tool)
- Sword (damage output)
- Leggings
- Helmet, Boots, Axe, Shovel (situational)
How to Craft the Smithing Table: Step-by-Step
The exact placement in your crafting grid matters — this isn't a shapeless recipe.
Open your 3×3 crafting table (not your 2×2 inventory grid — the recipe won't fit). Place materials in this exact pattern:
```
```
Step-by-step:
You'll get exactly 1 smithing table per craft. The recipe does not stack outputs.
Finding a Smithing Table vs. Crafting One
Sometimes the fastest path isn't crafting — here's when to skip the recipe entirely.
Smithing tables spawn naturally in one specific location: villages. Specifically, they appear in the toolsmith's house as the toolsmith villager's job site block. If you find a village early, you might snag a free smithing table before you've even gathered iron.
| Method | Speed | Resource Cost | Reliability |
|---|---|---|---|
| Craft from scratch | Medium | 2 iron + 4 planks | 100% reliable |
| Loot from village | Fast (if nearby) | Free | Depends on village spawning |
| Trade/buy | N/A | Not tradeable | — |
| Creative mode | Instant | Free | 100% |
Village Toolsmith Logic:
How to Use the Smithing Table Correctly
The crafting recipe gets you the block — but knowing how to use it is what actually upgrades your gear.
Place the smithing table by right-clicking/interacting on the ground. Right-click it again to open the interface. In 1.20+, you'll see three slots:
Slot 1 — Smithing Template: Required for both Netherite upgrades and armor trims. For Netherite, use the Netherite Upgrade Smithing Template (found in Bastion Remnant chests). For armor trims, use any of the 16 trim templates found across various structures.
Slot 2 — Gear: The diamond item you're upgrading, or the armor piece you're trimming.
Slot 3 — Material: Netherite ingot for upgrades; specific material (gold, iron, copper, etc.) for trim color.
Netherite Upgrade Process:
Armor Trim Process:
Common Mistakes Players Make With Smithing Tables
These errors waste time, materials, and sometimes irreplaceable items.
Mistake 1: Trying to craft in the inventory grid
The 2×2 personal grid won't work. You need a full crafting table. This catches new players constantly.
Mistake 2: Forgetting the Netherite Upgrade Template post-1.20
If you updated from an older world or watched an old tutorial, you might try placing just diamond gear + Netherite ingot without a template. This does nothing in 1.20+. You must have the template.
Mistake 3: Breaking the smithing table with the wrong tool
While you can break it with your fist, an axe is significantly faster. Using a pickaxe on a smithing table is slower than an axe — it's a wood-based block, not stone.
Mistake 4: Confusing the smithing table with a grindstone
Both are utility blocks, both unlock toolsmith trades, and both look vaguely similar. The grindstone removes enchantments; the smithing table adds upgrades. Mixing these up can ruin enchanted gear.
Mistake 5: Wasting trim materials by not checking the preview
The output slot shows you a preview before you commit. Always check the preview — trim colors vary wildly by material and some combinations look far better than others on specific armor sets.
Mistake 6: Assuming all smithing templates are reusable
They're not. Each template is consumed in one use. To duplicate them, you need the template + 7 diamonds + the corresponding block type (e.g., Netherrack for Netherite Upgrade Templates) at a crafting table.
Pro Strategies for Smithing Table Efficiency
Once you understand the basics, here's how experienced players optimize around this block.
Duplicate Your Netherite Upgrade Template Immediately
The moment you find a Netherite Upgrade Template, duplicate it before using it. One template + 7 diamonds + Netherrack at a crafting table = 2 templates. Do this repeatedly before you start upgrading gear so you have a full set of templates for helmet, chestplate, leggings, boots, sword, pickaxe, axe, and shovel.
Upgrade Gear in the Right Order
Priority order for Netherite upgrades based on impact:
Use Armor Trims as Inventory Organization
Hardcore and survival players use different trim patterns on different armor sets to visually distinguish them in chests — for example, one trim pattern for PvP gear, another for mining gear, another for Nether trips.
Pre-Enchant at Diamond, Then Upgrade
Always fully enchant your diamond gear before upgrading to Netherite. Enchanting Netherite directly is much harder because Netherite items have higher enchantability floors, and the enchantments carry over on upgrade anyway. Max out Protection IV, Unbreaking III, Mending, etc. at diamond level first.
Station Your Smithing Table Near Your Nether Portal
Logistically, you're most likely to use the smithing table immediately after a Bastion or Nether Fortress run. Placing it close to your portal means you upgrade gear before re-entering instead of scrambling mid-dungeon.
Conclusion: Master the Smithing Table, Master Late-Game Progression
The smithing table recipe is simple — two iron ingots and four planks — but the block itself is a gateway to the strongest gear in the game. Craft it early, understand the three-slot interface if you're on 1.20+, secure your Netherite Upgrade Templates before you start burning Netherite ingots, and always pre-enchant at diamond level before upgrading. Avoid the common traps of wrong crafting grids, missing templates, and wasted trim materials. Do it right, and you move from diamond to Netherite with zero wasted resources and fully enchanted gear ready for anything the game throws at you.
RELATED ARTICLES
How to Make a Brewing Stand in Minecraft: Recipe & Uses
If you've hit a wall in Minecraft — mobs are one-shotting you, your armor feels useless, and the End seems impossible — a brewing stand is the tool that changes everything. Potions transform your surv...
How to Make Glass in Minecraft: A Complete Smelting Guide
Glass is one of those crafting staples that looks simple on the surface but hides a surprising number of ways to go wrong — and a lot of creative potential most players never tap. Whether you're build...
How to Get Blaze Rods in Minecraft: Find and Farm Blazes
Blaze rods are one of the most critical bottlenecks in Minecraft progression — without them, you can't brew potions, reach the End, or craft Eyes of Ender. Most players die repeatedly trying to get th...
STAY UPDATED
New blog posts, guides, and community tips delivered to your inbox.
No spam. Unsubscribe anytime.
Comments (0)
No comments yet. Be the first to share your thoughts!

