TABLE OF CONTENTS
How to Make a Loom in Minecraft: Recipe & Uses
If you've ever tried slapping a banner pattern together with just a crafting table, you already know how painfully limited your options are — that's exactly why the loom exists. Knowing how to make a loom in Minecraft unlocks a dramatically expanded banner customization system that saves dye, cuts crafting complexity, and gives you access to patterns you simply cannot make any other way. This guide goes deeper than the recipe — it covers every use case, version difference, and mistake that trips up players who just want great-looking banners.
Crafting the Loom in Minecraft
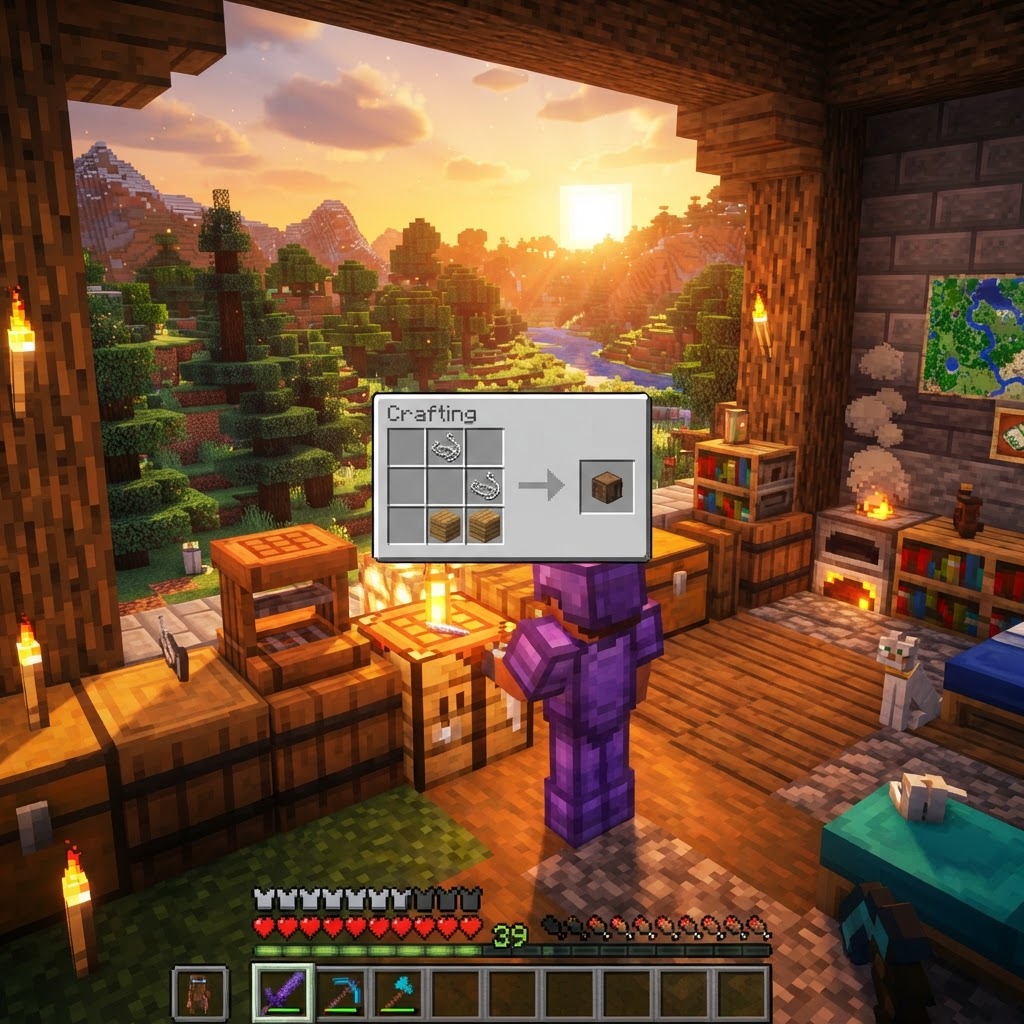
Two planks and two strings — but placement matters more than you think.
The loom recipe is intentionally simple, which makes it accessible early-game. You don't need a furnace, no ore processing, no trips to the Nether. Everything you need is available in your first forest biome.
Crafting Recipe (Shaped):
- Open your crafting table (3×3 grid)
- Place 2 String side by side in the top row (columns 1 and 2, or 2 and 3 — any two adjacent top cells)
- Place 2 Wood Planks directly below the string (matching positions)
- Retrieve the Loom from the output slot
Material Breakdown:
- String: Obtained from spiders (common at night), cobwebs (shears in mineshafts), or fishing. Two string is trivially easy to collect within your first game night.
- Wood Planks: Any type works — oak, spruce, jungle, crimson, warped. Mix and match freely. The loom's output is identical regardless of plank type.
- Left Slot (Banner): Your base banner — any color, any existing pattern already applied
- Middle Slot (Dye): A single dye of any color to apply the new pattern layer
- Right Slot (Banner Pattern Item — Optional): Required only for special/unique patterns; most patterns need no item here
- Horizontal and vertical stripes (top, bottom, left, right, middle)
- Diagonal halves and quarters
- Gradient fades (top/bottom gradient)
- Chevron, rhombus, cross, saltire
- Border and inside border
- Brick, curly border, flower charge, creeper charge (wait — those need pattern items)
The loom is also available as a naturally generated block inside village shepherd houses. If you locate a plains, savanna, or taiga village, you can simply grab the loom without crafting. Just note that taking a villager's job site block will un-employ the shepherd if they haven't traded with you yet.
Understanding the Loom Interface
Three input slots, one powerful output — knowing what goes where changes everything.
When you right-click the loom, you see an interface unlike a standard crafting table. There are three dedicated input slots and a scrollable pattern list:
The right side of the interface shows a scrollable grid of patterns. Without any banner pattern item in the third slot, you'll see approximately 40 base patterns available. Scroll through, click your choice, and the preview window shows exactly what the finished layer looks like before you commit.
Input/Output Summary:
| Slot | Required | What Goes Here |
|---|---|---|
| Banner | Yes | Any blank or patterned banner |
| Dye | Yes | Any of the 16 dye colors |
| Banner Pattern (item) | No (optional) | Specific item for unique patterns only |
Every Pattern the Loom Unlocks
Some of these patterns are completely inaccessible without the loom.
This is the real reason you want a loom. The crafting table only offers a handful of patterns using specific dye-plus-item recipes that are unintuitive and hard to remember. The loom centralizes everything with a visual interface and massively expands your options.
Patterns available without a banner pattern item (base patterns, ~40 total) include:
Patterns requiring a Banner Pattern item:
| Pattern Name | Required Item | How to Get Item |
|---|---|---|
| Creeper Charge | Creeper Banner Pattern | Craft: paper + creeper head |
| Skull Charge | Skull Banner Pattern | Craft: paper + wither skeleton skull |
| Flower Charge | Flower Banner Pattern | Craft: paper + oxeye daisy |
| Thing (Mojang logo) | Thing Banner Pattern | Craft: paper + enchanted golden apple |
| Snout | Snout Banner Pattern | Found in bastion remnant chests |
| Globe | Globe Banner Pattern | Found by trading with cartographer villagers |
|---|---|---|
| Flow | Flow Banner Pattern | Found in trial chamber vaults (1.21+) |
| Guster | Guster Banner Pattern | Found in trial chamber vaults (1.21+) |
Loom vs. Crafting Table for Banners
The crafting table method is objectively worse in almost every scenario.
Some players stick with the crafting table out of habit. Here's why that's holding them back:
| Feature | Loom | Crafting Table |
|---|---|---|
| Pattern preview | Yes — visual before confirming | No — must memorize/look up recipes |
| Dye cost per pattern | 1 dye | 1–8 dye depending on recipe |
| Patterns available | ~40+ base + 8 special | ~16 (limited set) |
| Requires memorization | No | Yes |
| Special patterns (Creeper, Skull, etc.) | Yes, with pattern item | Yes, but same recipe complexity |
| Early game accessibility | Immediate (2 string, 2 planks) | Already have it |
|---|
The only scenario where the crafting table wins is if your loom is destroyed and you need one specific pattern in an emergency. Otherwise, always use the loom.
Common Mistakes Players Make With Looms
These errors waste materials, ruin banners, and cause hours of frustration.
1. Layering in the wrong order
Banners render layers bottom to top. If you put a white gradient on first and then a solid color field, the solid covers the gradient. Sketch your design concept before you start — or use an online banner design tool to plan the stack.
2. Thinking banner pattern items are consumable
Already mentioned but worth repeating: Creeper heads, wither skulls, oxeye daisies used in crafting banner pattern items produce a durable tool. The loom slot for it is non-destructive. Don't craft duplicates.
3. Using the crafting table for patterns that the loom does better
If you're wasting 6 dyes on a crafting table recipe when the loom does the same thing for 1 dye, you're playing inefficiently. The loom's dye cost is always exactly 1 per layer.
4. Confusing Java and Bedrock layer limits
Both Java and Bedrock support 6 layers. However, in older Bedrock versions (pre-1.16), the limit was lower. If you're on a legacy console edition, check your version.
5. Stripping patterns without realizing it
You cannot "undo" a banner layer in survival without using a cauldron (Java only — and it removes the top layer using water). Many players don't know this exists. If you make a mistake, fill a cauldron with water and interact with the banner to strip one layer at a time.
Pro Strategies for Advanced Banner Design
Once you understand the system, you can create remarkably detailed flags, logos, and builds.
Stack contrasting gradients for depth effects
Apply a top-gradient in one color, then a bottom-gradient in a contrasting color over a different base. The overlap in the center creates a natural mid-tone blend that simulates lighting on in-game signage or team emblems.
Use the border pattern as a frame layer
Always save one of your six layers for a border if you're making decorative banners. A thin contrasting border around a detailed center design gives it a "finished" look compared to raw patterns that bleed to the edges.
Replicate banners efficiently with the loom
If you need 20 identical banners for a build, craft all 20 blank banners first, then run them through the loom sequentially applying the same layers. You only need to set up the pattern once per layer — it stays selected until you change it.
Combine banners with shields
In Java Edition, you can apply a banner's design directly to a shield using a crafting table (banner + shield). This means your carefully designed loom-crafted banner becomes wearable combat armor. Prioritize designs that look good at small scale — fine details get lost.
Use named banners as location markers
Name a banner at an anvil before placing it. Named banners show their custom name on the map when placed, making them ideal as labeled waypoints in multiplayer servers or large single-player worlds. Design color-coded banners at the loom for different landmark types (red = danger zone, green = farm, blue = base).
Conclusion
A two-minute craft that unlocks one of Minecraft's most underrated creative systems.
Making a loom in Minecraft costs almost nothing — 2 string and 2 planks — but it pays off every time you want a banner that looks intentional rather than accidental. The crafting table's banner system is clunky, dye-hungry, and limited. The loom is visual, efficient, and comprehensive, giving you 40+ patterns with a single dye each and access to rare special patterns no other method provides.
The key takeaways: craft it early, never throw away banner pattern items, plan your layer order before you start, and remember the cauldron trick if you need to undo mistakes on Java. Once it's in your base workflow, you'll wonder why you ever tried to manage banners without it.
RELATED ARTICLES
How to Make a Brewing Stand in Minecraft: Recipe & Uses
If you've hit a wall in Minecraft — mobs are one-shotting you, your armor feels useless, and the End seems impossible — a brewing stand is the tool that changes everything. Potions transform your surv...
How to Make Glass in Minecraft: A Complete Smelting Guide
Glass is one of those crafting staples that looks simple on the surface but hides a surprising number of ways to go wrong — and a lot of creative potential most players never tap. Whether you're build...
How to Get Blaze Rods in Minecraft: Find and Farm Blazes
Blaze rods are one of the most critical bottlenecks in Minecraft progression — without them, you can't brew potions, reach the End, or craft Eyes of Ender. Most players die repeatedly trying to get th...
STAY UPDATED
New blog posts, guides, and community tips delivered to your inbox.
No spam. Unsubscribe anytime.
Comments (0)
No comments yet. Be the first to share your thoughts!

