TABLE OF CONTENTS
Make a Brewing Stand in Minecraft: Crafting Guide & Tips
If you're trying to make potions in Minecraft, you're completely stuck without a brewing stand — it's the one block that makes the entire alchemy system work. Players often waste hours hunting for the wrong materials or miss the fact that blaze rods are non-negotiable for the recipe. This guide cuts through the confusion, walks you through exactly how to make a brewing stand, and covers everything you need to actually use it effectively once it's built.
What You Need to Make a Brewing Stand
The two ingredients that matter — and why one of them forces you into the Nether
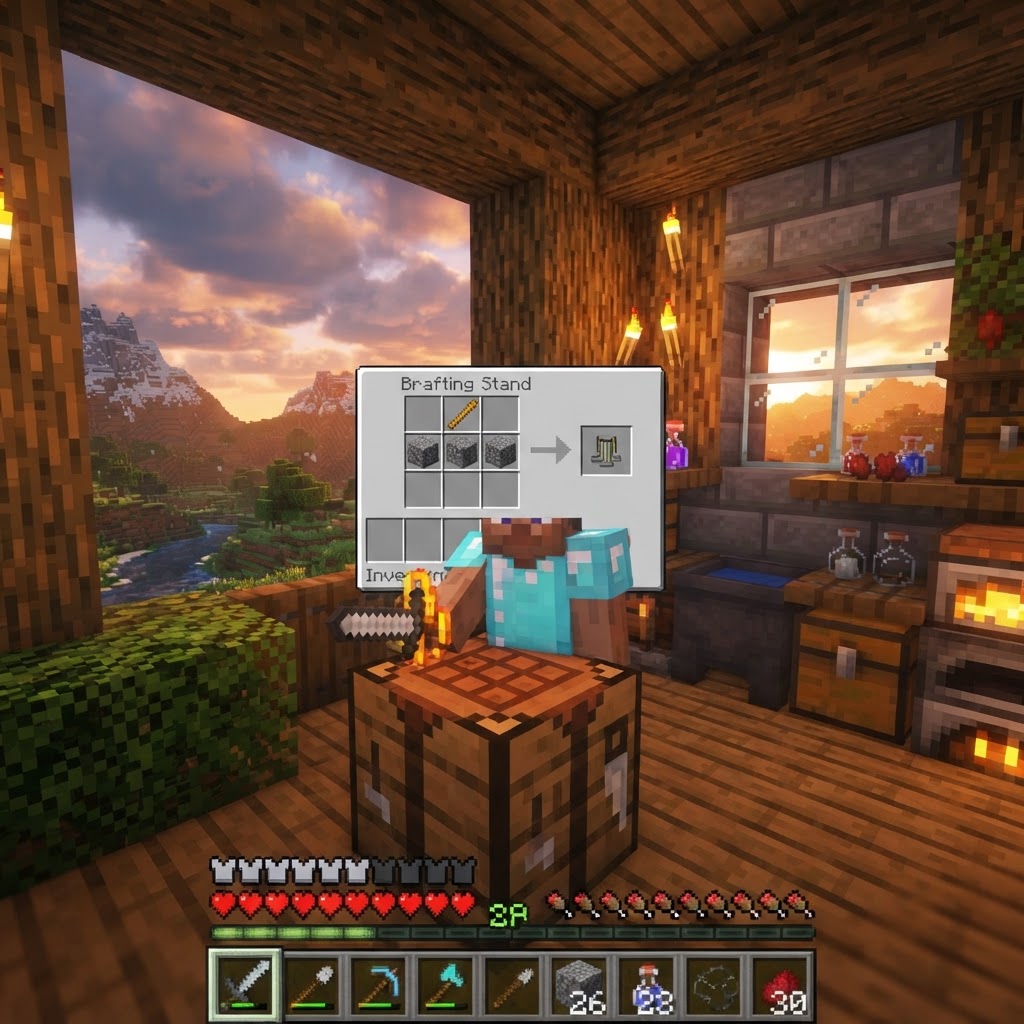
The brewing stand recipe requires exactly two types of materials: one Blaze Rod and three Cobblestone (or Blackstone, or Cobbled Deepslate). The cobblestone is the easy part. The blaze rod is the problem.
Blaze rods only drop from Blazes, hostile mobs that spawn exclusively in Nether Fortresses. This is the single biggest roadblock for new players trying to unlock potions — you cannot skip the Nether. There's no crafting alternative, no trade shortcut that bypasses this requirement in early game.
Here's a breakdown of every valid material for the base slots:
| Material | Works in Crafting? | Notes |
|---|---|---|
| Cobblestone | ✅ Yes | Easiest to get, standard choice |
| Blackstone | ✅ Yes | Found in the Nether Basalt Deltas |
| Cobbled Deepslate | ✅ Yes | Found below Y=0 in the Deepslate layer |
| Stone | ❌ No | Must be cobblestone form |
| Smooth Stone | ❌ No | Processed too far, doesn't count |
| Granite / Diorite | ❌ No | Common mistake — won't work |
|---|
Getting the Blaze Rod:
- Build or locate a Nether portal (requires 10 Obsidian and a Flint and Steel)
- Enter the Nether and search for a Nether Fortress — look for the brick-like structure that generates above lava seas
- Find a Blaze Spawner inside the fortress (usually in open-air corridor sections)
- Kill Blazes until you get at least one Blaze Rod (they drop 0–1 per kill, so bring good gear)
- Return to the Overworld safely
- Row 1: Empty | Blaze Rod | Empty
- Row 2: Cobblestone | Cobblestone | Cobblestone
- Three bottle slots at the bottom (where your potions go)
- One ingredient slot at the top (where you put your brewing ingredient)
- One fuel slot on the left (this requires Blaze Powder — another reason Blazes are mandatory)
How to Craft the Brewing Stand
The exact recipe, grid placement, and what to do the second it's made
Open your crafting table (3x3 grid). The recipe is straightforward:
Brewing Stand Recipe:
Place the Blaze Rod in the center top slot and fill the entire bottom row with cobblestone. That's it. Drag the brewing stand into your inventory.
Once placed in the world, right-click to open the brewing interface. You'll see:
Where to Find a Brewing Stand Without Crafting It
Skip the Nether prep if you know where to look — but it comes with trade-offs
If you're not ready for the Nether yet but desperately need a brewing stand, there are two locations where they generate naturally in the world:
1. Igloos (Basement Level)
About 50% of igloos generate with a hidden basement beneath a carpet-covered trapdoor. Inside you'll find a brewing stand with a Splash Potion of Weakness already loaded. This is extremely useful for early-game players.
2. End Ships (End Cities)
End Ships, found floating near End Cities in the outer End islands, always contain a brewing stand. However, getting here requires defeating the Ender Dragon first — so this option is late-game only.
| Source | Stage Required | Loot Included | Reliability |
|---|---|---|---|
| Craft It | Mid-game (post-Nether) | None | 100% reliable |
| Igloo Basement | Early-game | Splash Weakness Potion + Golden Apple | ~50% of igloos |
| End Ship | Late-game (post-Dragon) | Brewing Stand + Elytra room nearby | 100% in End Ships |
| Village Cleric House | Early-game | Brewing Stand only, no loot | Common in villages |
Using Your Brewing Stand: The Basics You Actually Need
Understanding the interface so your first potions don't fail
Building the stand is only half the battle. Here's how to actually brew your first potion:
Step 1 — Fuel it up. Put Blaze Powder in the left fuel slot. You'll see a flame icon activate. One Blaze Powder = 20 brews.
Step 2 — Fill glass bottles with water. Right-click a water source with Glass Bottles in hand. You can fill up to three at once.
Step 3 — Place Water Bottles in the three bottom slots.
Step 4 — Add Nether Wart to the top ingredient slot. This creates Awkward Potions, the base for almost every useful potion in the game. Don't skip this step — most potions require an Awkward Potion foundation.
Step 5 — Add your effect ingredient. Drop in the item that gives your potion its effect (Sugar for Speed, Magma Cream for Fire Resistance, etc.)
Step 6 — Optionally modify. Add Glowstone Dust to strengthen, Redstone Dust to extend duration, or Gunpowder to make it a throwable Splash Potion.
Common Mistakes Players Make With Brewing Stands
The errors that waste materials, time, and blaze rods
Mistake 1: Using the wrong stone
As covered above — Granite, Diorite, Andesite, and smooth Stone do not work. Use Cobblestone, Blackstone, or Cobbled Deepslate only.
Mistake 2: Forgetting Blaze Powder as fuel
The brewing stand won't do anything without it. New players open the interface, put ingredients in, and wait — nothing happens. Check the fuel slot first.
Mistake 3: Skipping Nether Wart for the first brew
Trying to brew an effect ingredient directly into water bottles usually produces a Mundane or Thick Potion — useless byproducts. Almost every recipe starts with Nether Wart → Awkward Potion → Effect Ingredient.
Mistake 4: Brewing modifications in the wrong order
You can't add Glowstone and Redstone to the same potion — they cancel each other out. Decide whether you want a stronger effect OR a longer duration, not both.
Mistake 5: Not farming enough Blazes in one run
Going back to the Nether repeatedly for single blaze rods is inefficient and dangerous. When you find the spawner, farm it aggressively. Get at least 6–10 rods on your first dedicated run — you'll need them for both fuel and multiple brewing stands if you expand your base.
Mistake 6: Breaking the brewing stand incorrectly
If you break a brewing stand without a pickaxe, it drops nothing. Always use a pickaxe to recover it.
Pro Strategies for Advanced Brewers
How experienced players optimize their potion setups
Build a Dedicated Brewing Room
Set up multiple brewing stands side by side. You can run three stands simultaneously, tripling output. Each needs its own Blaze Powder fuel, but the time savings are massive when preparing for a boss fight or long expedition.
Pre-fill all three slots every time
Always brew in batches of three. Never waste a brewing operation on a single bottle — the stand brews all three slots at once with no extra fuel cost.
Set up a Blaze Spawner Farm
Once you find a Blaze Spawner in the Nether Fortress, don't just raid it — build a farm around it. A simple platform with walls, a funnel system, and a kill zone gives you near-infinite blaze rods passively. This removes the single biggest resource bottleneck in the entire potion system.
Use Hoppers to automate
Hoppers can feed items into the ingredient slot and fuel slot of a brewing stand. Combine this with a chest full of Nether Wart and a water bottle dispenser setup for a semi-automated potion factory — no manual interaction needed beyond collecting output.
Know your modifier priority
When crafting potions for PvP specifically, Splash + Lingering combinations matter. Convert a Splash Potion with Dragon's Breath to get a Lingering Potion — these create area-of-effect clouds, perfect for choke points or cave defense.
Stock Weakness Potions for curing Zombie Villagers
Weakness Potions + Golden Apples cure Zombie Villagers into regular Villagers, giving you a massive trading advantage. A brewing stand pays for itself immediately in trading value when used this way — especially if you're building a village economy.
Conclusion: The Brewing Stand Is Your Gateway to Mid and Late Game Power
Making a brewing stand is genuinely one of the most impactful crafting milestones in Minecraft. The moment you have one fueled and operational, you unlock an entire system — Fire Resistance, Strength, Invisibility, Healing, Night Vision — that fundamentally changes how you play the game.
The key takeaways: you need a Blaze Rod (no shortcuts), use cobblestone not stone, always fuel with Blaze Powder, and start every potion chain with Nether Wart. Avoid the common mistakes around ingredient order and stone type, farm your Blaze Spawner properly, and scale up to multiple stands as soon as you can.
Potions aren't optional in Minecraft — they're the difference between surviving a Wither fight and respawning in frustration. Get your brewing stand built, get your first batch of Awkward Potions running, and start making the game significantly easier on yourself.
RELATED ARTICLES
How to Make a Book in Minecraft: Easy Recipe & Uses
You're probably here because you just hit a wall — enchanting, writing, or crafting something advanced — and realized you need books but aren't sure how to get them efficiently. Books are one of Minec...
How to Make a Blast Furnace in Minecraft: Recipe & Uses
If you've been manually smelting ores one by one in a regular furnace, you're wasting serious time — the Minecraft blast furnace doubles your smelting speed for metals and ores, making it one of the m...
How to Make a Smoker in Minecraft: Recipe & Uses
If you're tired of waiting forever for your food to cook in a standard furnace, the smoker is the upgrade you didn't know you needed. It cooks food items at exactly twice the speed of a regular furnac...
STAY UPDATED
New blog posts, guides, and community tips delivered to your inbox.
No spam. Unsubscribe anytime.
Comments (0)
No comments yet. Be the first to share your thoughts!