TABLE OF CONTENTS
Make a Shield in Minecraft: Complete Crafting & Usage Guide
Getting hit without a shield in early Minecraft isn't just painful — it's often fatal. Whether you're pushing into your first cave system, facing a skeleton barrage, or staring down a pillager raid, a shield is the single most important defensive tool you can craft before iron armor is even finished. This guide covers everything from materials to advanced blocking mechanics so you stop dying to damage you could have negated entirely.
Why a Shield Changes Everything in Early Game
The difference between dying on your third night and surviving your first week.
Most new players rush toward swords and armor while completely ignoring the shield — and they pay for it. A shield blocks up to 100% of incoming damage from the front when you're actively crouching or right-clicking, making it more reliable in many situations than a full set of iron armor. Armor reduces damage; a shield eliminates it.
Here's what a shield protects you from:
- Melee attacks from zombies, skeletons, pillagers, vindicators
- Ranged projectiles including arrows, crossbow bolts, and tridents
- Explosions — a shield significantly reduces blast damage from creepers
- Fire charges launched by ghasts (in Nether scenarios)
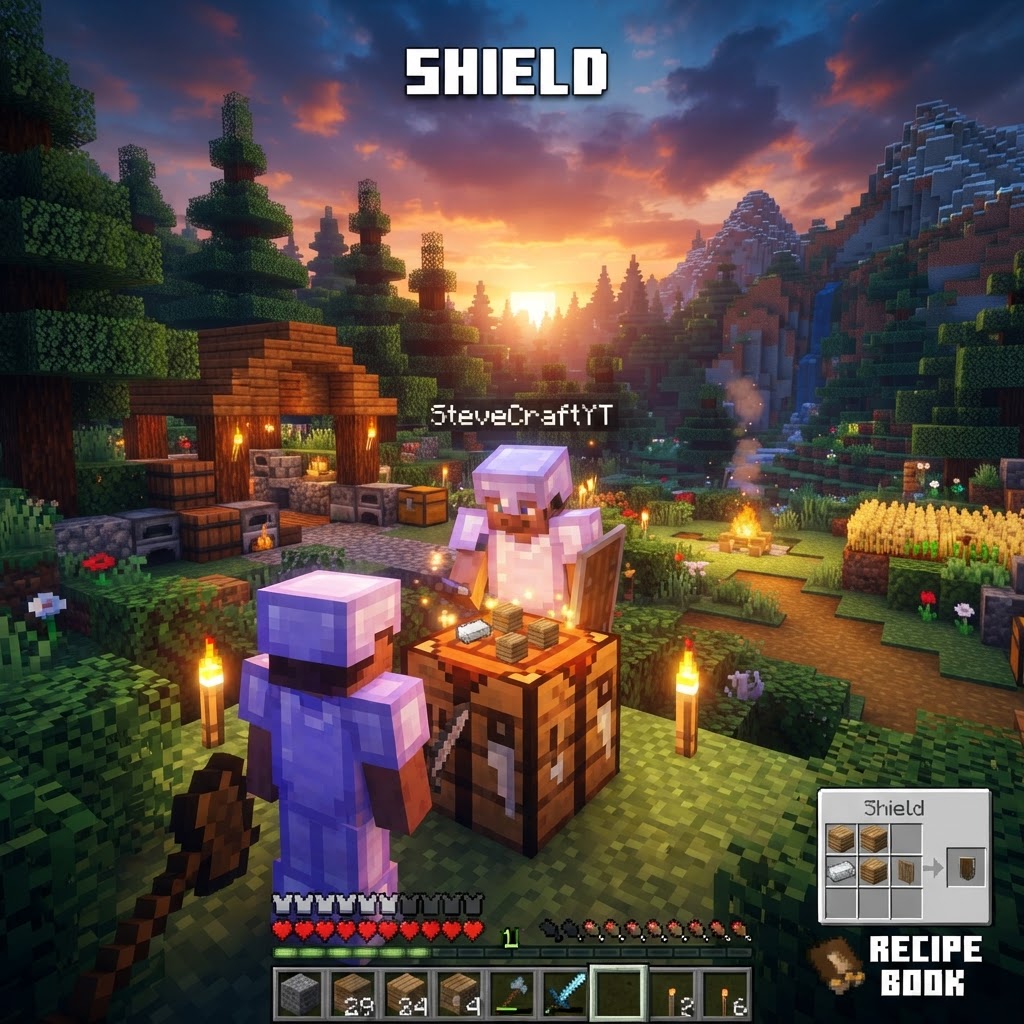
- Open your Crafting Table (3x3 grid required — your inventory 2x2 won't work)
- Place 1 iron ingot in the top center slot (Row 1, Column 2)
- Place wooden planks in the following pattern:
- Row 1: Plank | Iron Ingot | Plank
- Row 2: Plank | Plank | Plank
- Row 3: Empty | Plank | Empty
- Drag the shield from the output slot into your inventory
- Wooden planks: Convert any logs (oak, spruce, dark oak, etc.) — 1 log = 4 planks
- Iron ingot: Smelt iron ore or raw iron in any furnace; iron nuggets do NOT substitute
- Craft or obtain a banner with your desired design (loom or crafting table)
- Open a Crafting Table
- Place the shield in the left slot and the banner in the right slot (no specific grid position required — just combine the two)
- Retrieve the customized shield from the output
- You can only apply one banner pattern per shield
- Applying a new banner overwrites the previous design
- The customization survives enchanting and anvil repairs
- Banners do not affect shield durability or stats in any way
- Java Edition: Right-click and hold with the shield in your off-hand slot
- Bedrock Edition: Crouch (sneak) while holding the shield in your off-hand slot
- Blocking delay: There is a 5-tick (0.25 second) warm-up after you activate the shield before it begins blocking. Getting hit during this window deals full damage.
- Knockback: Successfully blocking melee attacks still applies a portion of knockback to you — blocking doesn't make you immovable.
- Durability cost: Each block costs durability. Shields have 336 durability on Java Edition.
- Axe vulnerability: Axes can disable your shield for 5 seconds on a successful hit — this is intentional and critical to know in PvP and against vindicators.
- Shield repair: Use an anvil with planks (any type) to repair durability, or combine two damaged shields in a crafting grid.
The shield becomes available the moment you have wood and iron — resources you'll collect within your first 10 minutes of gameplay. There's genuinely no reason to skip it.
Crafting the Shield: Exact Recipe and Materials
Every material, every placement — no guessing.
Crafting a shield requires exactly 6 wooden planks (any wood type) and 1 iron ingot. The wood type does not affect stats — mix oak, spruce, birch, or any other planks freely.
Step-by-step crafting instructions:
Material sourcing tips:
| Material | Quantity Needed | Where to Find |
|---|---|---|
| Wooden Planks (any type) | 6 | Chop any tree, craft logs into planks |
| Iron Ingot | 1 | Mine iron ore (stone level or below), smelt in furnace |
| Crafting Table | 1 (to use) | Craft with 4 planks in 2x2 inventory grid |
Customizing Your Shield with Banners
Turn a functional tool into a personal statement — with real gameplay identity.
Shields can be decorated using banners, giving you one of the most visually distinctive customization options in the game. This is purely cosmetic, but it's a feature many players never discover.
How to apply a banner to a shield:
Important limitations:
| Banner Base Color | Visual Effect on Shield | Crafting Requirement |
|---|---|---|
| White | White field over wood grain | White wool + stick |
| Black | Dark, near-solid appearance | Black wool + stick |
| Red | Classic aggressive look | Red wool + stick |
| Blue | Clean, defensive aesthetic | Blue wool + stick |
| Custom Pattern | Varies by loom design used | Loom + specific dye combinations |
How Blocking Actually Works: Shield Mechanics Explained
Knowing when to raise your shield is more valuable than knowing how to craft it.
The shield isn't a passive item — it requires active input to function. Understanding the timing and trigger mechanics separates players who get annihilated in raids from players who walk out clean.
Activating the shield:
Critical mechanics to understand:
| Damage Source | Shield Blocks? | Notes |
|---|---|---|
| Melee (sword, fist) | ✅ Yes | Reduces to 0 if fully blocked |
| Arrows / Crossbow bolts | ✅ Yes | Must face the projectile |
| Creeper explosion | ✅ Partial | Significantly reduced, not zero |
| Axe attack | ⚠️ Disables | 5-second cooldown after disable |
| Fire / Lava | ❌ No | Shield does not block environmental fire |
| Fall damage | ❌ No | Entirely separate damage type |
|---|---|---|
| Wither skulls | ❌ No | Passes through shield blocking |
Common Mistakes Players Make with Shields
These are the exact errors that get players killed even when they have a shield equipped.
Mistake 1: Holding the shield in the main hand
The shield only functions as a defensive tool when placed in the off-hand slot (the slot to the left of your hotbar). Holding it in a regular hotbar slot means you're just holding a plank sandwich — it won't block anything.
Mistake 2: Activating the shield too late
Because of the 0.25-second activation delay, players who raise their shield the instant they see a projectile coming are still taking the hit. You need to pre-raise the shield when you anticipate damage, not react to it.
Mistake 3: Assuming the shield blocks everything
Multiple damage types bypass the shield entirely (see table above). Players who rely on the shield against wither skeletons or try to block lava burns are in for a bad time.
Mistake 4: Neglecting shield durability
A shield at 1 durability still technically works — until it breaks mid-fight. Check your equipment durability before entering difficult encounters. Keep a backup shield in your inventory during raids.
Mistake 5: Forgetting enchantments
Shields can receive the Unbreaking enchantment (reduces durability loss) and Mending (repairs via XP). Most players never enchant their shields and burn through them unnecessarily.
Pro Strategies: Advanced Shield Techniques
For players who already have the basics down and want a genuine edge.
1. Shield + Sword Juggling (Java PvP)
In Java Edition, you can rapidly switch between offensive attacks and shield blocking by alternating right-click (block) and left-click (attack). Skilled players use this rhythm to block incoming hits between their own strikes — especially effective against skeletons and pillagers.
2. Banner Design as Team Identification
In multiplayer servers or realms, applying consistent banner designs to all team members' shields creates instant visual identification during combat. Use unique color combinations your team agrees on.
3. Pre-block Before Opening Doors
If you're clearing a structure (dungeon, pillager outpost, stronghold), raise your shield before opening every door. Mobs on the other side will have their first attack negated automatically.
4. Shield-Blocking During Bow Charging
You cannot attack and block simultaneously, but you can block while charging a crossbow — this is a powerful defensive play. Load your crossbow behind cover, then advance with your shield raised.
5. Unbreaking III is your best enchant
Unbreaking III gives a 75% chance to avoid durability loss on each block. Over time, this quadruples your shield's effective lifespan. Prioritize it over any other shield enchantment.
6. Two Shields, One Fight
Against bosses or raids, carry a backup shield. When your primary shield hits low durability mid-encounter, swap immediately. Don't wait for it to break — a broken shield in a warden fight is a death sentence.
Conclusion: Shield First, Everything Else Second
A shield costs almost nothing — six planks and a single iron ingot — and it fundamentally changes how dangerous Minecraft's combat is. The key takeaways: craft it before your first night ends, place it in your off-hand slot, learn the 0.25-second activation delay, enchant it with Unbreaking III and Mending as soon as you can, and keep a backup ready for serious fights. Knowing what the shield doesn't block (warden, wither skulls, lava, axes) is just as important as knowing what it does. Get comfortable pre-raising it before encounters rather than reacting to them — that shift alone will cut your early-game deaths dramatically.
RELATED ARTICLES
How to Make a Book in Minecraft: Easy Recipe & Uses
You're probably here because you just hit a wall — enchanting, writing, or crafting something advanced — and realized you need books but aren't sure how to get them efficiently. Books are one of Minec...
How to Make a Blast Furnace in Minecraft: Recipe & Uses
If you've been manually smelting ores one by one in a regular furnace, you're wasting serious time — the Minecraft blast furnace doubles your smelting speed for metals and ores, making it one of the m...
How to Make a Smoker in Minecraft: Recipe & Uses
If you're tired of waiting forever for your food to cook in a standard furnace, the smoker is the upgrade you didn't know you needed. It cooks food items at exactly twice the speed of a regular furnac...
STAY UPDATED
New blog posts, guides, and community tips delivered to your inbox.
No spam. Unsubscribe anytime.
Comments (0)
No comments yet. Be the first to share your thoughts!