TABLE OF CONTENTS
Smithing Table Minecraft: How to Make (Recipe & Tips)
If you're standing at a regular crafting table trying to upgrade your Netherite gear and nothing is working, the Smithing Table is exactly what you're missing. This block became the cornerstone of late-game gear progression in Java 1.16+ and Bedrock equivalents, and understanding it fully is the difference between wearing diamond forever and ascending to Netherite. This guide covers everything from the crafting recipe to advanced upgrade strategies so you never waste a Netherite Ingot again.
Crafting the Smithing Table
You only need four materials — here's exactly what they are and where to get them fast.
The Smithing Table recipe is refreshingly simple compared to the complexity of what it does. You don't need rare materials, no Nether trip required, no special unlocks.
What You Need:
- 2 Iron Ingots
- 4 Planks (any wood type — mix and match freely)
Crafting Steps:
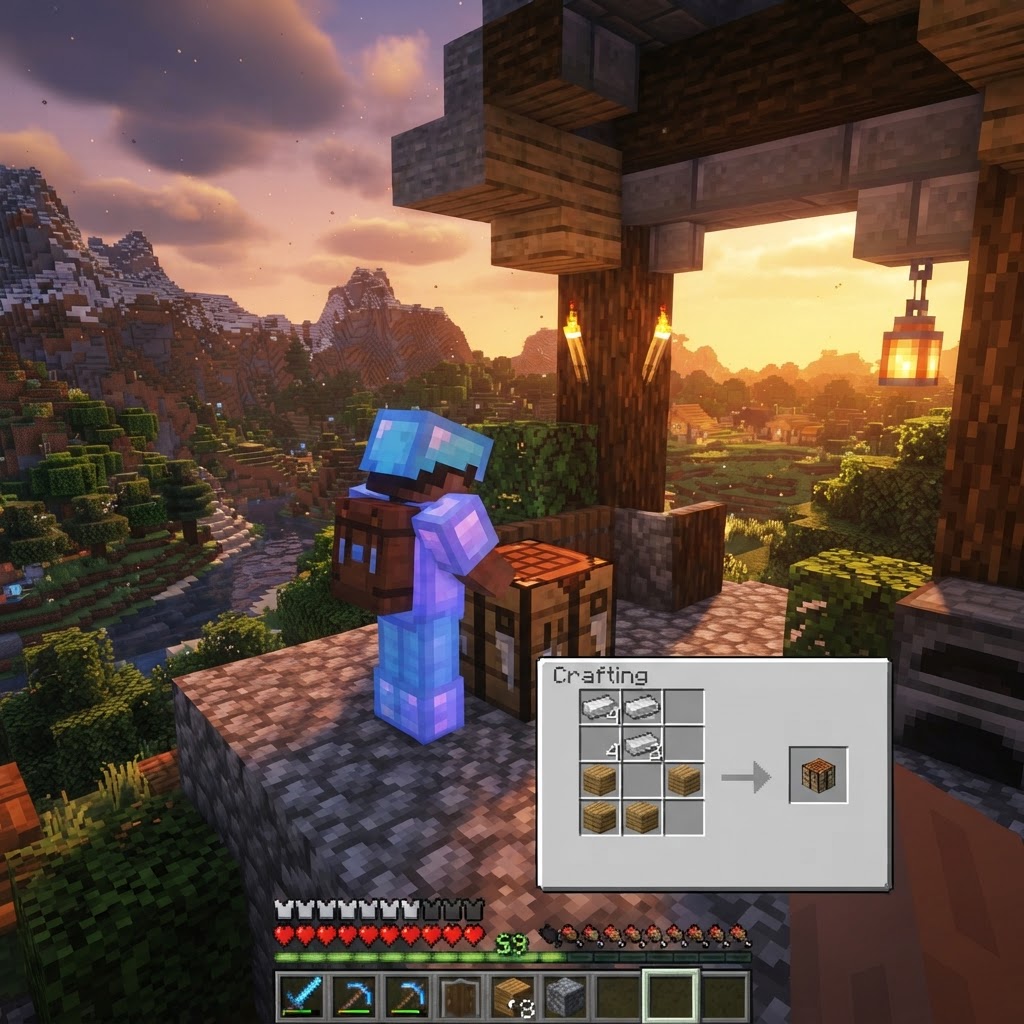
- Open your 3x3 crafting grid (Crafting Table required — inventory crafting won't work).
- Place 1 Iron Ingot in the top-left and 1 Iron Ingot in the top-center slots.
- Fill the entire bottom two rows (middle row and bottom row, columns 1–2 below the ingots) with 4 planks. Specifically: middle-left, middle-center, bottom-left, bottom-center.
- Drag the Smithing Table into your inventory.
- Smithing Template (leftmost slot)
- Base Item (middle slot)
- Material/Ingredient (rightmost slot)
- Location: Bastion Remnants in the Nether — specifically inside treasure room chests
- Drop Rate: Not guaranteed per chest, so expect to loot multiple Bastions
- Appearance: Looks like a dark tile with a diamond/armor icon pressed into it
- Place the Netherite Upgrade Template in the template slot
- Place a Diamond in the material slot
- Place 7 Netherite Scrap in...
- Craft it early with 2 Iron Ingots + 4 Planks, or steal one from a village Toolsmith house
- Always enchant diamond gear first, then upgrade — the transfer is free and lossless
- On 1.20+, you need a Netherite Upgrade Smithing Template from a Bastion — plan your Nether trips around this
- The Smithing Table doesn't repair or enchant — that's the Anvil's job, and you need both
- Upgrade priority matters when Netherite is scarce: Chestplate and Boots first
Alternative: Finding One in the Wild
Smithing Tables generate naturally inside Toolsmith houses in villages. If you're near a village, you can break and collect one without crafting — just bring a pickaxe (any type works, though it's faster with better materials). This is genuinely worth doing if you find a village early since it saves your iron for tools.
| Source | Effort Required | Conditions |
|---|---|---|
| Craft it yourself | Low — 2 iron + 4 planks | Any time after getting a Crafting Table |
| Village loot | Very Low — just break it | Must find a Toolsmith house |
| Toolsmith trade | N/A — not tradeable | Cannot be obtained via trade |
What the Smithing Table Actually Does
It's not just an upgrade block — it's the gatekeeper between diamond and the best gear in the game.
New players often make a Smithing Table, stare at the interface, and have no idea what to put in it. Here's the complete picture.
The Smithing Table has two primary functions:
1. Netherite Upgrades (Java 1.16 – 1.19)
In these versions, you combine a Diamond item + a Netherite Ingot to produce a Netherite version of that item. Simple, two-slot interface.
2. Full Smithing System (Java 1.20+ / Bedrock equivalent)
The 1.20 "Trails & Tales" update overhauled the Smithing Table completely. It now has three input slots:
This means you now need a Netherite Upgrade Smithing Template in addition to your Diamond item and Netherite Ingot. This catches a lot of returning players off guard.
What Can Be Upgraded?
| Diamond Item | Netherite Result | What's Preserved |
|---|---|---|
| Diamond Sword | Netherite Sword | All enchantments, name, durability % |
| Diamond Pickaxe | Netherite Pickaxe | All enchantments, name, durability % |
| Diamond Axe | Netherite Axe | All enchantments, name, durability % |
| Diamond Shovel | Netherite Shovel | All enchantments, name, durability % |
| Diamond Hoe | Netherite Hoe | All enchantments, name, durability % |
| Diamond Helmet | Netherite Helmet | All enchantments, name, durability % |
|---|---|---|
| Diamond Chestplate | Netherite Chestplate | All enchantments, name, durability % |
| Diamond Leggings | Netherite Leggings | All enchantments, name, durability % |
| Diamond Boots | Netherite Boots | All enchantments, name, durability % |
This is critical: All enchantments carry over automatically. Enchant your diamond gear first, then upgrade to Netherite — you don't pay any XP cost at the Smithing Table.
Getting the Netherite Upgrade Smithing Template (1.20+)
This is the piece most guides skip — and it's the most frustrating part of the upgrade process.
If you're on a modern version, you need to track down the Netherite Upgrade Smithing Template before you can upgrade anything. Here's where to find it:
Once you have one, you can duplicate it using the Smithing Table's template duplication mechanic:
Wait — that's not right. Template duplication actually happens at a Crafting Table, not the Smithing Table. You combine the template + 7 of its "base material" + a diamond block to produce 2 copies. For the Netherite Upgrade Template specifically, you need 7 Netherite Scraps and 1 Diamond Block.
Smithing Table vs. Anvil — Which Do You Actually Need?
Players constantly confuse these two — they serve very different purposes and you need both.
This is one of the most common points of confusion in mid-to-late game progression.
| Feature | Smithing Table | Anvil |
|---|---|---|
| Upgrade Diamond → Netherite | ✅ Yes | ❌ No |
| Apply Enchanted Books | ❌ No | ✅ Yes |
| Repair Items | ❌ No | ✅ Yes |
| Rename Items | ❌ No | ✅ Yes |
| Combine Enchantments | ❌ No | ✅ Yes |
| XP Cost | ❌ None | ✅ Yes (sometimes high) |
|---|---|---|
| Material Cost | ✅ Yes (ingot/template) | ✅ Yes (materials or XP) |
| Preserves Enchantments | ✅ Automatically | ✅ Yes (when combining) |
The smart workflow is: Enchant at the Enchanting Table → Add books at the Anvil → Upgrade to Netherite at the Smithing Table. Doing it in this order costs the least XP and materials overall.
Common Mistakes Players Make
These errors waste Netherite, lose enchantments, and break progression — avoid every single one.
1. Upgrading to Netherite BEFORE Enchanting
This is the biggest mistake. If you upgrade your Diamond Sword to Netherite and then try to enchant it, enchanting a Netherite item at the table gives fewer enchantment levels than diamond (lower enchantability). Always enchant diamond first, then upgrade.
2. Forgetting the Smithing Template in 1.20+
Covered above, but worth repeating: the interface will accept your diamond item and Netherite Ingot but produce nothing without the template. Players sit there clicking in confusion for minutes before realizing.
3. Trying to Repair at the Smithing Table
The Smithing Table does not repair items. If your freshly upgraded Netherite sword is at 50% durability, you still need an Anvil (and another Netherite Ingot) to repair it. New players waste a trip to the Nether thinking the Smithing Table will fix this.
4. Breaking a Village Smithing Table with Fists
You can break it, but it won't drop. Use any pickaxe to collect it properly. Breaking it by hand just destroys it.
5. Thinking Armor Trims Work Like Upgrades
In 1.20+, armor trims are purely cosmetic. Applying a trim template at the Smithing Table changes appearance only — it does not affect stats, durability, or enchantments. Some players assume trims add protection. They do not.
Pro Strategies for Smithing Table Mastery
For players who want to squeeze maximum efficiency out of every Netherite Ingot.
1. Prioritize Your Upgrade Order
Don't upgrade everything at once. If you have limited Netherite, upgrade in this priority order: Chestplate → Boots → Leggings → Helmet → Sword/Pickaxe. Chestplate and Boots give the most protection value and the most knockback resistance (from Netherite's innate properties).
2. Bastion Farming for Templates
If you're on 1.20+ and need multiple templates for a full set, run dedicated Bastion Remnant raids. Piglins won't attack you if you wear any piece of Gold armor — keep a Gold helmet in your hotbar specifically for Bastion looting. This dramatically reduces the danger of template hunting.
3. Stack Your Enchantments Before Any Upgrade
Get every enchantment you want onto your Diamond gear before touching the Smithing Table. The transfer is lossless and free — every enchantment, every level, every combination carries over with zero XP cost. This is literally free value.
4. Use Armor Trims Strategically for Identification
While purely cosmetic, armor trims are a powerful organizational tool in multiplayer. Use different trim patterns on different armor sets to visually identify your "PvP set," "mining set," and "elytra set" at a glance in your inventory.
5. The Toolsmith Villager Exploit
Smithing Tables define the Toolsmith villager job. If you place a Smithing Table near an unemployed villager, they become a Toolsmith. Toolsmiths sell diamond tools at high levels — meaning you can get enchanted diamond items to upgrade without grinding the Enchanting Table yourself. Then just Netherite-upgrade their trades.
Final Takeaways
The Smithing Table is one of the most powerful blocks in Minecraft precisely because it's the only way to reach Netherite — but it's also where a lot of players stumble due to version changes, missing templates, and upgrade order mistakes. Here's what to lock in:
Master this workflow and you'll go from diamond to a fully enchanted Netherite set with minimum waste and maximum efficiency. That's the real goal here — not just knowing the recipe, but knowing the system well enough to execute it perfectly every time.
RELATED ARTICLES
How to Make a Book in Minecraft: Easy Recipe & Uses
You're probably here because you just hit a wall — enchanting, writing, or crafting something advanced — and realized you need books but aren't sure how to get them efficiently. Books are one of Minec...
How to Make a Blast Furnace in Minecraft: Recipe & Uses
If you've been manually smelting ores one by one in a regular furnace, you're wasting serious time — the Minecraft blast furnace doubles your smelting speed for metals and ores, making it one of the m...
How to Make a Smoker in Minecraft: Recipe & Uses
If you're tired of waiting forever for your food to cook in a standard furnace, the smoker is the upgrade you didn't know you needed. It cooks food items at exactly twice the speed of a regular furnac...
STAY UPDATED
New blog posts, guides, and community tips delivered to your inbox.
No spam. Unsubscribe anytime.
Comments (0)
No comments yet. Be the first to share your thoughts!