TABLE OF CONTENTS
Make a Beacon in Minecraft: Step-by-Step + Best Pyramid Tips
Beacons are one of the most powerful late-game tools in Minecraft, but most players waste hours grinding without understanding exactly what they need — or they build the pyramid wrong and wonder why nothing works. This guide cuts through the confusion by explaining not just how to make a beacon, but why each step matters, what the pyramid actually does, and how to get maximum value out of your investment.
What You Actually Need Before You Start
Gathering materials is the real bottleneck — here's the honest breakdown.
Most guides list the crafting recipe and call it a day. The truth is that the materials required to make a beacon are the hardest part of the entire process. Before you craft anything, you need to understand the full scope of the commitment.
To craft one beacon, you need:
- 5 Glass blocks (easy — smelt sand in a furnace)
- 3 Obsidian blocks (mine with a diamond or netherite pickaxe)
- 1 Nether Star (dropped by the Wither boss — this is the real challenge)
To make the pyramid functional, you also need:
- A minimum of 9 blocks of iron, gold, diamond, emerald, or netherite (for a Tier 1 pyramid)
- Up to 164 blocks for a full Tier 4 pyramid
- Open your crafting table (3x3 grid)
- Place 3 glass blocks across the top row
- Place 1 glass block in the middle-left cell, the Nether Star in the center, and 1 glass block in the middle-right cell
- Place 3 obsidian blocks across the bottom row
- Retrieve the beacon from the output slot
- Choose a flat location — you'll need a 9×9 footprint minimum
- Lay your 9×9 base layer (81 blocks) completely filled
- Center a 7×7 layer on top (49 blocks)
- Center a 5×5 layer on top of that (25 blocks)
- Center a 3×3 layer on top (9 blocks)
- Place the beacon block exactly in the center of the top 3×3 layer
- Right-click the beacon to open its menu
- Place one of the following in the payment slot: iron ingot, gold ingot, diamond, emerald, or netherite ingot
- Select your desired primary power (options depend on your pyramid tier)
- Click the checkmark to confirm
The Nether Star is your true gating item. You must defeat the Wither — a summoned boss that is arguably more dangerous than the Ender Dragon in enclosed spaces. Plan your Wither fight carefully, because it will destroy blocks, including any gear or items you leave nearby.
Crafting the Beacon Block
The recipe is simple — but the ingredients tell the whole story.
Once you have your Nether Star, glass, and obsidian ready, crafting the beacon itself is straightforward.
Step-by-step crafting process:
That's it. The beacon block itself is just the beginning — it does nothing without the pyramid underneath it.
Building the Pyramid: All Four Tiers Explained
Your pyramid size determines your powers — here's exactly what each tier gives you.
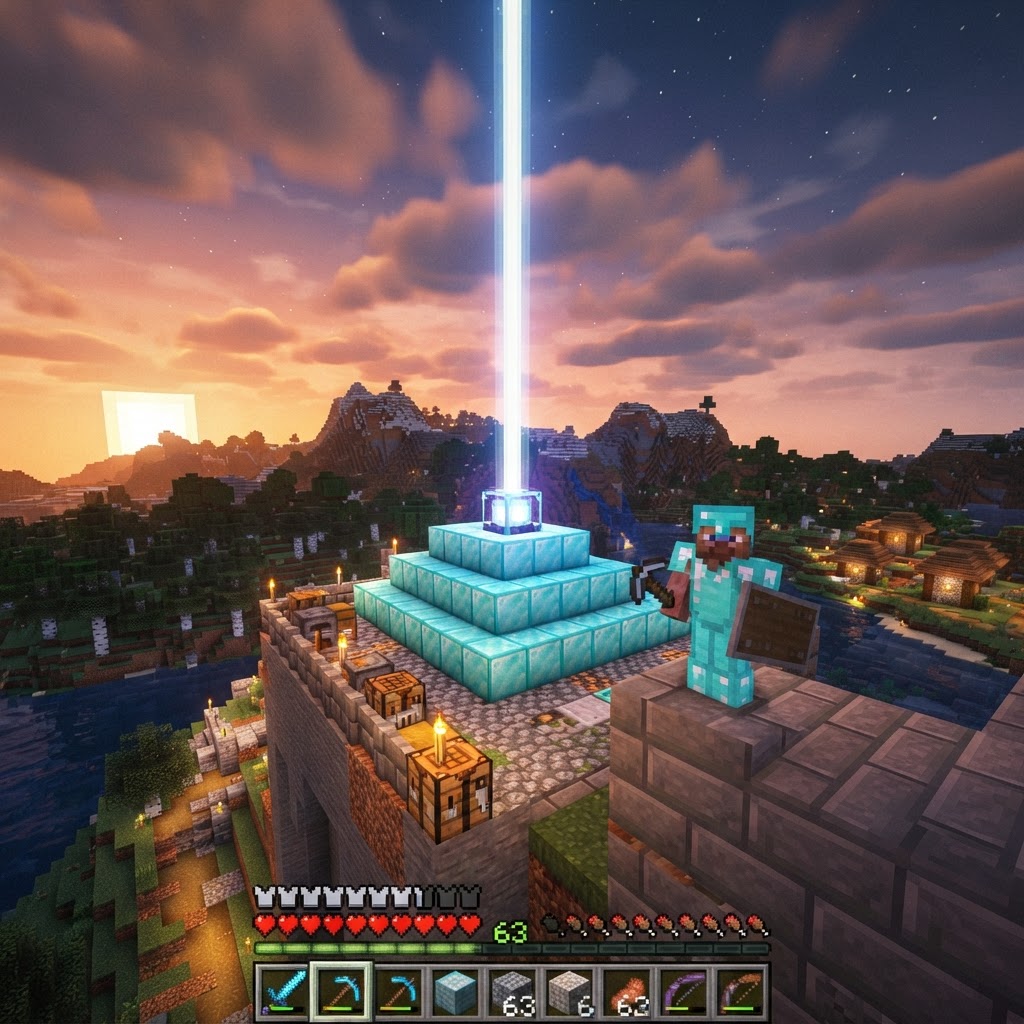
This is where most guides give vague instructions. Let's be precise. The beacon sits on top of the pyramid, and the pyramid can be 1 to 4 layers tall. Each layer must be fully filled with mineral blocks — no gaps, no dirt, no stone substitutes.
Pyramid Layout by Tier:
| Tier | Layers | Base Size | Total Blocks Needed | Powers Unlocked |
|---|---|---|---|---|
| 1 | 1 | 3×3 | 9 blocks | Speed OR Haste |
| 2 | 2 | 5×5 + 3×3 | 34 blocks | + Jump Boost OR Resistance |
| 3 | 3 | 7×7 + 5×5 + 3×3 | 83 blocks | + Strength |
| 4 | 4 | 9×9 + 7×7 + 5×5 + 3×3 | 164 blocks | + Regeneration + Second power slot |
Building steps for a Tier 4 pyramid:
Best Pyramid Materials Comparison:
| Material | Iron Blocks | Gold Blocks | Diamond Blocks | Emerald Blocks | Netherite Blocks |
|---|---|---|---|---|---|
| Availability | Very Common | Moderate | Rare | Rare | Very Rare |
| Resource Cost | 9 ingots/block | 9 ingots/block | 9 gems/block | 9 gems/block | 9 ingots/block |
| Renewable? | Yes (trading) | No | No | Yes (trading) | No |
| Best Use Case | Budget pyramid | Mid-game | Prestige builds | Renewable option | Max efficiency |
For purely practical builds, iron blocks are the go-to. You can mass-produce iron with iron golem farms, making a Tier 4 pyramid achievable without any mining luck. Diamond and netherite look impressive but offer zero gameplay advantage over iron.
Activating Your Beacon and Choosing Powers
Feeding the beacon the right item unlocks the buff — here's how to choose wisely.
A built pyramid isn't enough. You must activate the beacon by feeding it a payment item through its GUI. Right-click (or use your interact button) on the beacon to open the interface.
To activate:
The beacon effect radiates in a sphere around the beacon, with a range of 20 blocks (Tier 1) up to 50 blocks (Tier 4). Effects automatically reapply every 4 seconds, so you don't lose them as long as you stay in range.
Beacon Power Selection Guide:
| Power | Level | Best For |
|---|---|---|
| Speed I/II | Tier 1 / Tier 4 | Exploration, large bases |
| Haste I/II | Tier 1 / Tier 4 | Mining operations |
| Resistance I/II | Tier 2 / Tier 4 | Combat, dangerous builds |
| Jump Boost I/II | Tier 2 / Tier 4 | Parkour, vertical builds |
| Strength I/II | Tier 3 / Tier 4 | PvP, mob farms |
| Regeneration I | Tier 4 | Sustained combat |
|---|
Common Mistakes That Waste Your Time and Resources
Avoid these errors — they're the reason players rebuild their pyramids twice.
1. Summoning the Wither indoors without preparation
The Wither's explosion on spawn is massive. It destroys most blocks in its radius. Players frequently lose chests full of resources because they summoned the Wither next to their storage room. Always fight the Wither either in the End (where terrain is already barren), deep underground in bedrock-floored tunnels, or in an open area far from your base.
2. Building the pyramid under a roof
Indoor bases with low ceilings block the beacon beam. The beacon deactivates silently — no error message. Players spend minutes confused about why their buffs aren't applying before realizing there's a half-slab ceiling two blocks up.
3. Wasting diamond or netherite blocks on the full pyramid
164 netherite blocks is an absurd resource cost with zero benefit over 164 iron blocks. Use iron or mix materials intelligently — netherite on the visible top layers only if you want the aesthetic.
4. Only building a Tier 1 pyramid
Tier 1 gets you ONE power at Level 1. The jump from Tier 1 to Tier 4 costs more materials but unlocks Regeneration AND a second power simultaneously, making the efficiency jump enormous. If you're grinding for a beacon at all, push to Tier 4.
5. Placing the beacon off-center
The beacon must sit on top of the pyramid centered. If it's not directly above the middle block of each layer, it won't recognize the pyramid correctly and won't activate.
6. Ignoring beacon range when planning your base
Tier 4 gives you 50 blocks of range. If your mine entrance is 60 blocks from your beacon, you lose the effect the moment you walk in. Position your beacon to maximize overlap with where you actually spend time.
Pro Strategies for Maximum Beacon Value
This is what separates players who build one beacon from players who build networks.
Use multiple beacons for different work zones. A single beacon can only have one primary effect active at a time (plus one secondary at Tier 4). Serious players build beacon networks: one Haste II beacon at the mine, one Speed II beacon along their main road, one Regeneration + Strength beacon at their mob farm. Each only needs its own pyramid, but together they create a seamlessly buffed base.
Combine beacons on shared pyramids. You can place multiple beacon blocks on the same pyramid as long as each beacon is fully above a valid pyramid section. Two beacons on one Tier 4 pyramid can have different effects — effectively doubling your power coverage with one pyramid build.
Stack Haste II with Efficiency V and a beacon for insane mining speed. This three-way combination (Haste II beacon + Efficiency V pickaxe + Aqua Affinity helmet if underwater) is the fastest possible manual mining setup in the game. Players using this setup clear entire strip mine layers in minutes.
Pre-plan your beacon location before building your base. Retrofitting a beacon into an existing base is painful — you need sky access, a large flat area, and you can't place it in cramped quarters. New world? Mark your beacon spot early.
Use the Wither fight in the End to your advantage. The Wither destroys End Stone, but End Stone is infinite. Fight the Wither in a pre-dug underground chamber in the End, where the terrain destruction is irrelevant and the Wither can't escape or destroy your base. This is the safest Nether Star farm method available.
The Bottom Line on Beacons
Beacons are one of Minecraft's most satisfying late-game unlocks because the investment is genuinely proportional to the reward. The bottleneck is always the Nether Star — get that first, plan your Wither fight carefully, then build straight to Tier 4 using iron blocks rather than cutting corners at Tier 1 or wasting diamonds. Position your beacon where you actually work, choose Haste II for mining or Regeneration + Strength for combat, and consider building a second beacon for your secondary work zone.
The players who get the most out of beacons aren't the ones who built the most impressive pyramid — they're the ones who placed it in exactly the right spot and let it silently multiply their efficiency every single day.
RELATED ARTICLES
How to Make a Book in Minecraft: Easy Recipe & Uses
You're probably here because you just hit a wall — enchanting, writing, or crafting something advanced — and realized you need books but aren't sure how to get them efficiently. Books are one of Minec...
How to Make a Blast Furnace in Minecraft: Recipe & Uses
If you've been manually smelting ores one by one in a regular furnace, you're wasting serious time — the Minecraft blast furnace doubles your smelting speed for metals and ores, making it one of the m...
How to Make a Smoker in Minecraft: Recipe & Uses
If you're tired of waiting forever for your food to cook in a standard furnace, the smoker is the upgrade you didn't know you needed. It cooks food items at exactly twice the speed of a regular furnac...
STAY UPDATED
New blog posts, guides, and community tips delivered to your inbox.
No spam. Unsubscribe anytime.
Comments (0)
No comments yet. Be the first to share your thoughts!