TABLE OF CONTENTS
Make a Grindstone in Minecraft: Quick Crafting Guide
If you're trying to repair tools or strip enchantments without wasting your XP on an anvil, a grindstone is exactly what you need — and most players build one too late or use it wrong. Understanding when to use a grindstone versus an anvil or enchanting table can save you dozens of levels over a long survival run. This guide gives you everything: the recipe, the materials, the mechanics, and the strategies most tutorials skip entirely.
What a Grindstone Actually Does (And Why It Matters)
Before you build one, make sure you know what you're actually getting.
Most players google "how to make a grindstone" because their inventory is cluttered with damaged, low-enchantment tools and they want a clean solution. The grindstone solves two specific problems: it repairs tools by combining two of the same type, and it removes enchantments, returning some of the XP that was sunk into them. But it does not do everything — and misusing it costs you resources.
Here's a breakdown of exactly what the grindstone can and cannot do:
| Function | Grindstone | Anvil | Enchanting Table |
|---|---|---|---|
| Repair tools by combining | ✅ Yes (free) | ✅ Yes (costs XP) | ❌ No |
| Remove enchantments | ✅ Yes (partial XP return) | ❌ No | ❌ No |
| Add enchantments | ❌ No | ✅ Yes | ✅ Yes |
| Rename items | ❌ No | ✅ Yes | ❌ No |
| Remove curses | ❌ No | ❌ No | ❌ No |
| Work cost penalty | ❌ None | ✅ Increases each use | ❌ N/A |
|---|
The critical advantage of the grindstone over the anvil for basic repairs is zero XP cost. If you're combining two beaten-up iron pickaxes just to get a usable one, the grindstone does it for free. The anvil does the same job but charges XP — and that prior work penalty stacks up over time, eventually making items "too expensive" to repair at all. The grindstone resets none of that penalty, but it's the right tool for raw material-based repairs on unenchanted gear.
Materials You Need to Make a Grindstone
Three ingredients, all accessible within your first few days of a survival world.
The grindstone recipe requires exactly three item types:
- 2x Sticks — crafted from any wood planks (2 planks = 4 sticks)
- 1x Stone Slab — crafted from 3 cobblestone, stone, or smooth stone in a row
- 2x Wood Planks — any type works (oak, spruce, birch, jungle, acacia, dark oak, mangrove, cherry, bamboo, etc.)
Total raw materials from scratch: ~5 logs and ~3 cobblestone, assuming you need to make planks and sticks from scratch.
The wood plank type does not affect the grindstone's function. A grindstone made with jungle planks works identically to one made with spruce. This is purely cosmetic. However, the stone slab type matters only if you care about the block's appearance — functionally, all stone variants produce the same grindstone.
Step-by-Step: How to Craft a Grindstone
The exact process from raw materials to a working block in under two minutes.
- Gather wood — Punch or chop at least 2 logs from any tree.
- Open your crafting table — Right-click the crafting table to open the 3x3 grid.
- Craft planks — Place 1 log in any slot to get 4 planks. Repeat as needed.
- Craft sticks — Place 2 planks vertically in the crafting grid to get 4 sticks.
- Gather stone — Mine at least 3 cobblestone with a pickaxe (stone pickaxe or better recommended).
- Craft a stone slab — Place 3 cobblestone in a horizontal row across the bottom row of the crafting grid to get 6 cobblestone slabs. You only need 1.
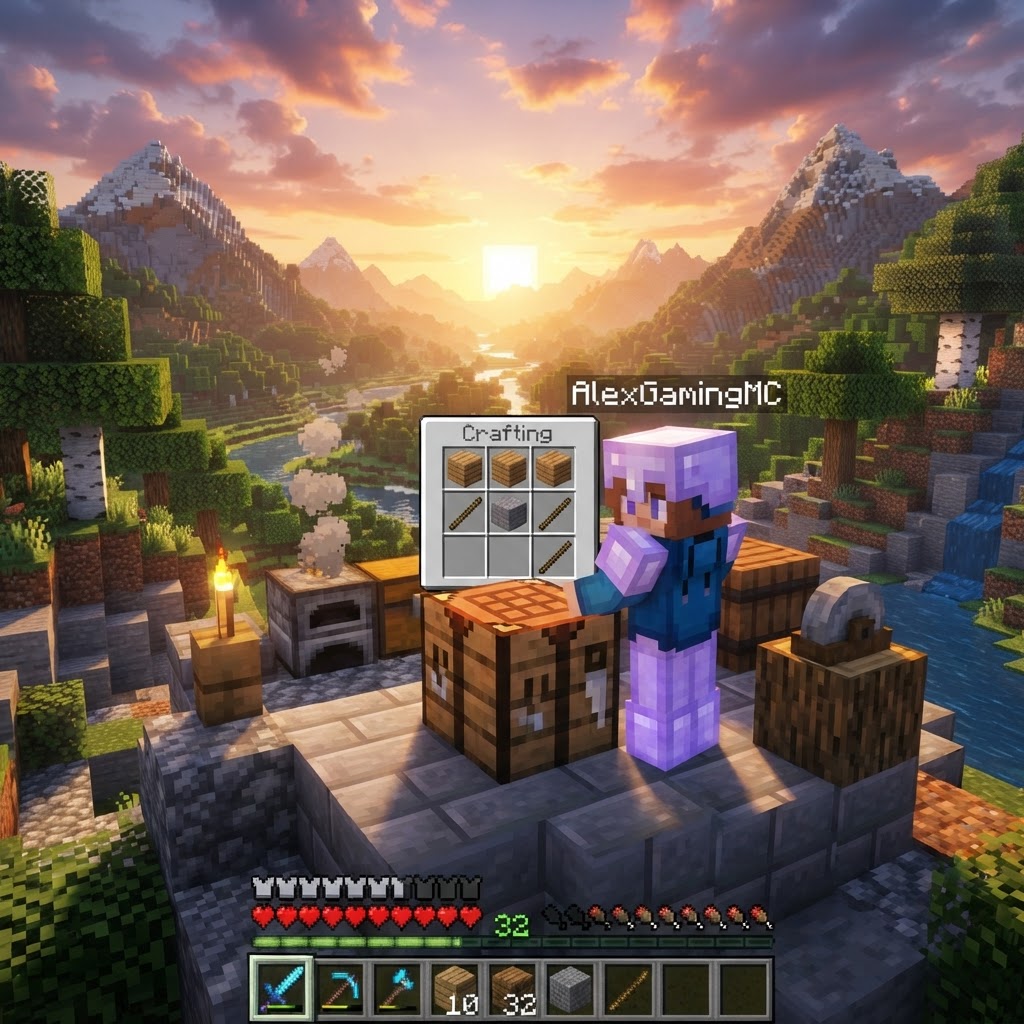
- Craft the grindstone — Arrange the ingredients in the crafting table exactly as shown:
```
```
Place the two sticks in the top-left and top-right corners, the stone slab in the top-center slot, and both wood planks in the middle-left and middle-right slots. The bottom row stays empty.
- Drag the grindstone from the output slot into your inventory.
- Place it by right-clicking any solid surface.
Grindstone vs. Alternatives: Choosing the Right Tool
Using the wrong repair method is one of the most common XP leaks in survival Minecraft.
This is where most guides go shallow. The grindstone is not always the right choice — it depends entirely on what you're repairing and what's on it.
| Situation | Best Tool | Why |
|---|---|---|
| Repairing unenchanted gear | Grindstone | Free, no XP cost |
| Repairing enchanted gear you want to keep | Anvil | Preserves enchantments |
| Stripping bad enchants from a book | Grindstone | Recovers some XP |
| Combining enchanted books | Anvil | Only option |
| Repair + enchant in one step | Anvil | Grindstone strips enchants |
| Resetting "too expensive" anvil cost | Neither works | Item is permanently expensive |
|---|---|---|
| Quick repair on diamond tools mid-game | Grindstone (if unenchanted) | Save XP for better gear |
The biggest mistake players make is using the grindstone on enchanted diamond tools they actually want to keep. The moment you slot an enchanted sword into a grindstone, those enchantments are gone. You get a fraction of the XP back, but Sharpness IV is worth far more than the 10–20 levels you'd recover.
Common Mistakes Players Make With Grindstones
These errors waste resources, XP, and good gear — avoid all of them.
Mistake 1: Stripping enchantments you wanted to keep
Players confuse "repairing" with "grinding." The grindstone does both simultaneously — combining two items and stripping all enchantments in one action. If you put a Looting III sword in there to repair it, Looting III is gone.
Mistake 2: Trying to remove curses
Curse of Binding and Curse of Vanishing are immune to the grindstone. No enchantment removal method in vanilla Minecraft can strip them except item destruction. Don't grind cursed armor hoping for a clean piece back — it won't happen.
Mistake 3: Not knowing when the grindstone appears naturally
Grindstones spawn in village weaponsmith buildings. You can steal one instead of crafting it, especially useful early game. Many players craft one unnecessarily when a village is nearby.
Mistake 4: Using it on books
Enchanted books can be placed in the grindstone to strip their enchantments, but this is almost never worth it. An enchanted book has real crafting value at the anvil. Grinding it wastes the enchantment for a tiny XP return.
Mistake 5: Forgetting the job block mechanic
Grindstones are the job site block for the Weaponsmith villager profession. If you place one near an unemployed villager, they'll claim it. If you're building a village trading hall, keep your personal grindstones away from unemployed villagers or you'll lose your job block.
Pro Strategies: Getting More Out of Your Grindstone
These techniques separate players who use a grindstone from players who use it well.
Strategy 1: The Enchant-Strip Loop for XP Farming
Enchant a book at level 1 cost using a max-level enchanting setup, then grind it for partial XP recovery. This isn't efficient solo, but in bulk it smooths out XP grinding when you have bookshelves set up and need to "cash in" low-level enchantments.
Strategy 2: Cleaning Gear Before a Major Enchant
If you have a good tool with a weak, undesirable enchantment (like Bane of Arthropods on your main sword), grind it clean before enchanting — don't waste it. A clean tool at the enchanting table has better odds for a fresh enchantment suite than trying to layer onto something conflicting.
Strategy 3: Pair It With a Mending Farm
Players who run mending on their gear often forget the grindstone entirely — and that's the goal. Once your best tools have Mending, you repair them via XP orbs passively. But your backup gear and early-game tools still benefit from grindstone free repairs during the transition phase.
Strategy 4: Pre-Combine Damaged Gear Before Mining Sessions
Keep a grindstone at your base entrance. Before heading out, combine any two damaged unenchanted pickaxes, shovels, or axes at the grindstone for free. You return with better-condition tools than if you'd run both into the ground separately.
Strategy 5: Weaponsmith Trading Exploit
Deliberately let a villager claim your grindstone to create a weaponsmith. Weaponsmiths sell enchanted swords and axes — some of the best mid-game weapons before you have your own enchanting setup. A grindstone you'd otherwise have two of becomes a trade source for gear you need.
Conclusion: Build It Early, Use It Intentionally
The grindstone is one of the most underused utility blocks in early-to-mid survival Minecraft — not because players don't know how to make it, but because they don't know exactly when it's the right tool versus when the anvil or enchanting table serves them better. Build your grindstone on day one using cobblestone slabs and leftover planks. Keep it at your base as a free repair station for unenchanted gear. Never slot enchanted items into it unless you've made the conscious decision to strip those enchantments. And remember: it spawns naturally in villages, resets villager professions, and cannot touch curses under any circumstances. Use it intentionally and it saves you dozens of XP levels over a survival playthrough. Ignore the nuance and it'll cost you gear you can't easily replace.
RELATED ARTICLES
How to Make a Book in Minecraft: Easy Recipe & Uses
You're probably here because you just hit a wall — enchanting, writing, or crafting something advanced — and realized you need books but aren't sure how to get them efficiently. Books are one of Minec...
How to Make a Blast Furnace in Minecraft: Recipe & Uses
If you've been manually smelting ores one by one in a regular furnace, you're wasting serious time — the Minecraft blast furnace doubles your smelting speed for metals and ores, making it one of the m...
How to Make a Smoker in Minecraft: Recipe & Uses
If you're tired of waiting forever for your food to cook in a standard furnace, the smoker is the upgrade you didn't know you needed. It cooks food items at exactly twice the speed of a regular furnac...
STAY UPDATED
New blog posts, guides, and community tips delivered to your inbox.
No spam. Unsubscribe anytime.
Comments (0)
No comments yet. Be the first to share your thoughts!