TABLE OF CONTENTS
Minecraft Composter: How to Make, Use & Automate
If you've ever stared at a chest overflowing with seeds, rotten flesh, and excess crops, you already understand why the Minecraft composter matters. It solves a real inventory problem while also giving you a steady supply of bone meal — one of the most versatile materials in the game. This guide goes beyond the basics to show you how to build, use, and fully automate a composter so nothing in your farm goes to waste.
Crafting the Composter in Minecraft
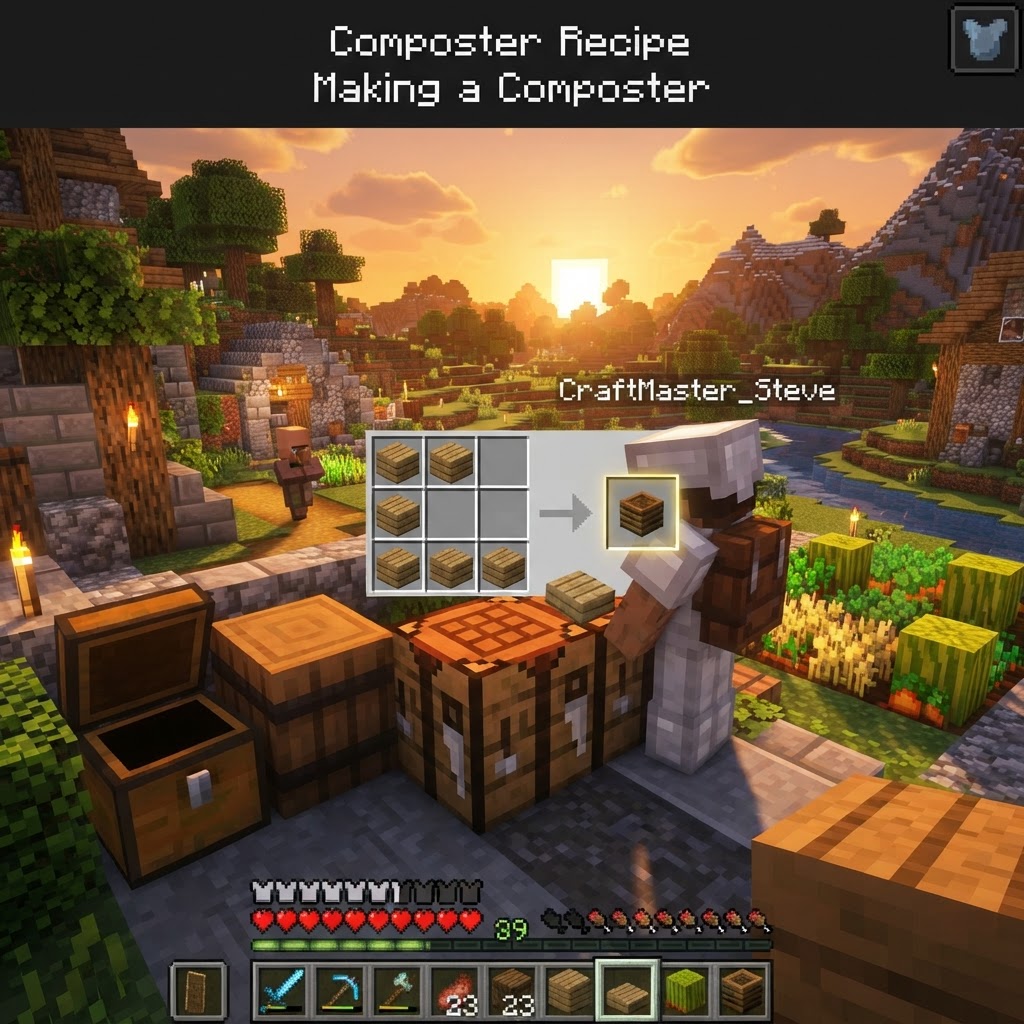
You only need seven planks — but the placement matters.
The composter recipe is one of the most forgiving in the game, but players still manage to get it wrong on the first try. Here's exactly how to do it.
Crafting Recipe (Shapely):
- Open your 3×3 crafting table grid.
- Place wooden slabs (any type, mixed or matched) in this pattern:
- Row 1: Slab | Empty | Slab
- Row 2: Slab | Empty | Slab
- Row 3: Slab | Slab | Slab
- Collect the composter from the output slot.
That's it — 7 wooden slabs of any wood type. Oak, spruce, crimson, warped — they all work and can even be mixed in the same recipe. You don't need a full plank, just slabs, which makes this incredibly cheap early game.
Alternative Source: Composters also generate naturally in village farms. If you're near a village early on, you can break and collect one without crafting anything at all — it drops itself when broken with any tool or by hand.
What Goes Into a Composter (And What Doesn't)
Not every plant belongs in here — knowing the difference saves wasted clicks.
One of the most common frustrations with composters is tossing in an item and getting nothing. The composter doesn't accept every organic material, and items that ARE accepted don't all have the same chance of raising the compost level.
The composter has 7 fill levels. Once it reaches level 7, it produces a bone meal item on the next use. Each accepted item has a percentage chance of raising the level by 1 — high-value items advance it faster.
Compostable Item Tiers
| Chance of Raising Level | Items |
|---|---|
| 30% | Melon slice, beetroot seeds, dried kelp, grass, hanging roots, leaves (all types), moss carpet, seagrass, small flowers, sweet berries, vine, wheat seeds |
| 50% | Cactus, dried kelp block, flowers (tall), melon, pumpkin, sea pickle, shroomlight, spore blossom, sugarcane |
| 65% | Apple, beetroot, carrot, cocoa beans, fern (large), kelp, lily pad, nether wart, oak/dark oak sapling, potato, pumpkin/melon seeds, red/brown mushroom, saplings (most), wheat |
| 85% | Baked potato, bread, cookies, dried kelp (block), hay bale, mushroom stew, pumpkin pie, rabbit stew |
| 100% | Cake, glow berries (in some versions) |
Items that do NOT work:
- Rotten flesh
- Bones (ironic, since bone meal is the output)
- Wooden items (sticks, planks, logs)
- Mushroom blocks
- Stone, dirt, sand, gravel
- Most crafted food items (pumpkin pie is an exception)
Maximizing Bone Meal Efficiency
The difference between a casual composter and an efficient one is which items you feed it.
If your goal is bone meal production — and it usually is — then efficiency matters. You want the most bone meal per item inserted.
Bone Meal Output: Best vs. Worst Sources
| Item | Compost Chance | Notes |
|---|---|---|
| Cake | 100% | Always raises level — best single item |
| Bread | 85% | Easy to mass-produce from wheat |
| Hay Bale | 85% | 9 wheat per bale — compact delivery |
| Wheat | 65% | Standard farm byproduct |
| Melon Slice | 30% | Weak — only good if you have surplus |
| Leaves | 30% | Poor return — skip unless desperate |
|---|---|---|
| Seeds (Wheat/Melon/Pumpkin) | 30–50% | Decent if you have thousands |
The math on efficiency: Getting from level 0 to level 7 requires filling the bar. At 30% per item, you're averaging about 23 items per bone meal. At 85%, you're averaging about 9 items. That's a massive difference at scale.
Automating the Composter with Hoppers
This is where the composter goes from convenient to genuinely powerful.
A manually-operated composter is fine for casual use. But if you're running any kind of farm — wheat, melons, pumpkins, bamboo, kelp — you want full automation. Here's how to set it up correctly.
Basic Automated Setup:
- Place your composter on the ground.
- Place a hopper on top of the composter, connecting into it (sneak + right-click the composter with the hopper in hand).
- Place a hopper below the composter, connecting into a chest beneath.
- Feed farm output into the top hopper via a chest or additional hopper line from your farm.
Now your farm waste flows in from the top, the composter processes it, and finished bone meal drops out the bottom automatically — no clicks required.
Expanded Farm Integration:
For a full crop farm loop:
- Run a hopper line from your auto-harvester output chest to the top hopper of the composter.
- Run the output hopper into a dedicated "bone meal chest."
- Connect that chest to a dispenser facing your crops for automated bone meal application.
This creates a closed loop: your farm grows, harvests itself, compostes the excess, and uses the bone meal to grow faster.
Common Mistakes Players Make with Composters
Most frustrations with this block come from a handful of predictable errors.
1. Trying to compost non-organic items
Stone, dirt, rotten flesh — if it doesn't grow or wasn't grown, it probably won't work. Check the tier list above before assuming something should compost.
2. Forgetting the composter needs to reach level 7
Players often check the composter after inserting one or two items, see no bone meal, and assume it's broken. The block needs to fill through all 7 visible layers before it produces anything.
3. Connecting the hopper to the wrong face
If your hopper line isn't pulling bone meal out or isn't inserting items, check the connection direction. Hoppers always need to be pointed at the target block when placed.
4. Using low-efficiency items when better options are available
Feeding leaves or grass into your composter when you have bread or wheat sitting in chests is a waste of automation potential. Sort your farm output to prioritize higher-tier compostables.
5. Not placing a composter under a villager to create a Farmer profession
This is purely a missed opportunity — a composter placed near an unemployed villager assigns them the Farmer job. This unlocks trading for crops and food, which has enormous value in survival worlds.
Pro Strategies for Advanced Players
Once you understand the basics, there are several ways to push the composter further.
Stack Multiple Composters in Parallel
One composter is a bottleneck for large farms. Run three or four in parallel, each fed by a separate hopper from the same input chest, and output into a shared collection system. This multiplies your bone meal throughput significantly.
Use Bamboo as a Near-Infinite Compost Source
Bamboo grows extremely fast, requires zero replanting, and composts at 35%. A large bamboo farm with an auto-harvester can generate hundreds of items per minute. Even at 30–35%, the sheer volume makes it one of the best passive compost sources in the game.
Combine with a Bone Meal Farm Dispenser
Using bone meal to grow crops faster, which then feeds more compost, which produces more bone meal — this loop is self-sustaining once you build it large enough. A pumpkin or melon farm works especially well because each harvest generates both food and seeds.
The Farmer Villager Trade Loop
Assign a villager as a Farmer using your composter. Trade them crops for emeralds. Use emeralds to buy other goods. This turns your compost system into an indirect currency generator.
Use Composters as Decorative Blocks in Builds
Composters have a distinct barrel-like top texture that looks great in farm builds, rustic homes, and medieval settlements. They're cheap enough to place purely for aesthetics without feeling wasteful.
Final Takeaways
The Minecraft composter is one of those blocks that looks simple but rewards players who understand its depth. Here's what to remember:
- Craft it with 7 wooden slabs — any type, cheaply available from the start.
- Feed it high-tier items like bread, wheat, and baked potatoes for the best bone meal efficiency.
- Automate with hoppers above and below to turn any farm into a passive bone meal factory.
- Avoid common mistakes like using non-compostable items or misconnecting hoppers.
- Use it to create Farmer villagers — a frequently overlooked use case with serious long-term value.
The difference between a player who occasionally uses a composter and one who builds around it is efficiency at scale. Once you automate it properly, you'll never be short on bone meal again — and your farms will be faster, smarter, and genuinely self-sustaining.
RELATED ARTICLES
How to Make a Book in Minecraft: Easy Recipe & Uses
You're probably here because you just hit a wall — enchanting, writing, or crafting something advanced — and realized you need books but aren't sure how to get them efficiently. Books are one of Minec...
How to Make a Blast Furnace in Minecraft: Recipe & Uses
If you've been manually smelting ores one by one in a regular furnace, you're wasting serious time — the Minecraft blast furnace doubles your smelting speed for metals and ores, making it one of the m...
How to Make a Smoker in Minecraft: Recipe & Uses
If you're tired of waiting forever for your food to cook in a standard furnace, the smoker is the upgrade you didn't know you needed. It cooks food items at exactly twice the speed of a regular furnac...
STAY UPDATED
New blog posts, guides, and community tips delivered to your inbox.
No spam. Unsubscribe anytime.
Comments (0)
No comments yet. Be the first to share your thoughts!